- Patient preparation
- Activating wireless telemetry
- Programming the ICD prior to implantation
- Testing the leads prior connection to the ICD generator
- Testing the leads after connection to the ICD generator
- Preparation for the induction of ventricular fibrillation
- Induction of ventricular fibrillation
- After Induction
1 - Patient preparation
- Attach the defibrillator patches to the patient and connect them to the external defibrillator, which must be turned on. Ensure that a there is a good quality ECG trace and that the R wave is appropriately detected (in case synchronised shock is required).
- Check that the patch for the electrocautery is applied to the thigh or calf.
- Ensure that the surface ECG is connected to the programmer and that a good quality ECG trace is obtained. The sequence of connection should be
Right side Left side
Red Yellow
Black Green
- Prepare the equipment required for implantation, including leads and device, sheathes for delivery of leads, pacemaker identification card to give to the patient, sterile pouch for the wand of the programmer.
- If a generator change is to be performed the existing device should be interrogated, the pre-existing programming details and therapy history should be recorded. The lead parameters should be measured and the patients underlying rhythm should be determined.
Once the patient has been attached to the external defibrillator, remember to turn off device therapies.
NB: Any changes to the programming must be validated by pressing the program key on the programmer.
2 - Activating wireless telemetry
In order to activate the wireless telemetry, the header of the programmer should be placed over the device. Once the device has been identified, wireless telemetry is activated by selecting the option activate telemetery on the programmer. The green LED lights up when wireless telemetery has been successfully activated.
Remarks:
- During the interrogation, the box 'Allow wireless communication' should be checked.
- To change from a wireless telemetry session to a session using the programming head, it is necessary to press 'Logout' and restart so that a new session is activated.
- Conexus: System Requirements: 2090W The programmer must be equipped with Conexus Wireless icon.

Duration of Conexus wireless telemetry session
- At the start: the programmer detects the device, (Consulta / Secura) for 15 min and the window 'Find Patient' is displayed for 5 min.
- During the session: there is no time limit.
- After 'End Session': re-examination is possible for 5 minutes (without starting a new session).
If the timer is stopped during the session, you must click on "Find Patient" (this is possible within 5 minutes of disconnection).
3 - Programming the ICD prior to implantation
- Interrogate the ICD (to stop printing the report press the 25 mm / s button twice).
- Check date and time on the device and reprogram if required.
- Test the capacitors - charge and then discharge. Then select 'RETRIEVE data appears after the CE marker (charge end). The normal value at 20 ° C is <10 seconds.
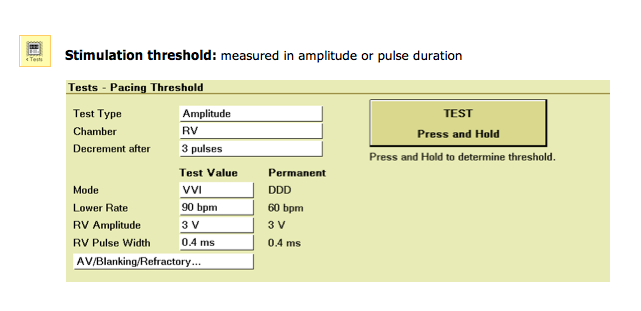
- Program the bradycardia pacing parameters, these are found in the stimulation window.
- Program therapies: select zones and program ATP and shocks as required (discussed in more detail below).
Additional Options
- Mode switch is programmed ON with nominal settings, this function ensures that high rate ventricular pacing does not occur as a result of tracking high atrial rates during atrial tachycardia or atrial fibrillation.
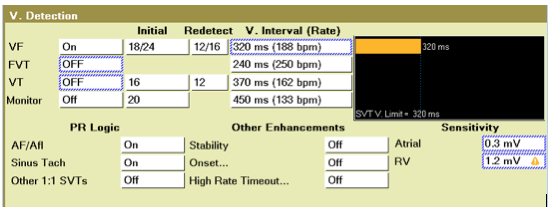
- Program the detection settings by selecting - detection
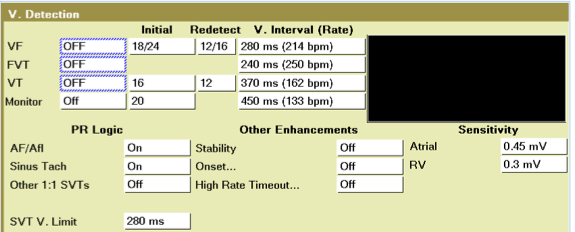
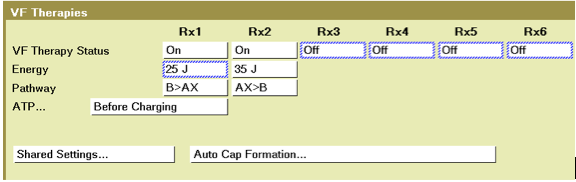
- program VF Therapies
- If possible, dump the capacitor charge (10 minutes).
- Program the clinical details into the device, including patient name, leads details, indications .

4 - Test the leads prior to connecting them to the ICD.
Measurements should be made in bi-polar configuration.
- Connect the black crocodile clip to the distal electrode (cathode- Tip) and the red crocodile clip to the proximal electrode (anode- ring).
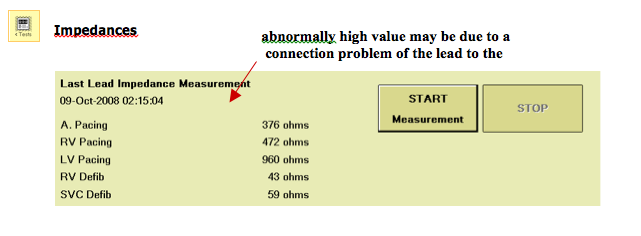
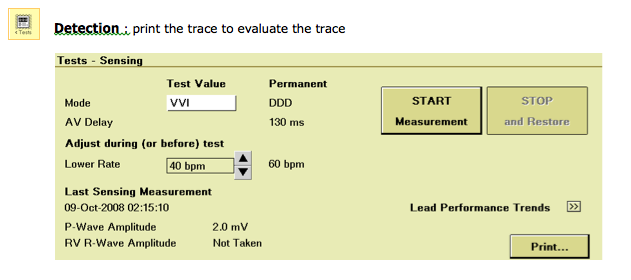
- Impedances, sensing and threshold should be checked for each lead.
- If a unipolar LV lead has been used: test pseudo-bipolar (black crocodile clip to distal electrode on the LV lead and red crocodile clip to proximal electrode on the RV lead).
- In the case of a multipolar LV lead with widely spaced electrodes (Attain Ability family ref. 4196, 4296 and 4396): test pseudo-bipolar 'Tip to ring’.
5 - Testing the leads after connection to the ICD generator
With a single coil lead, the impedance will be high until it has been placed into the pocket (impedance > 200 Ω). Also when programming the device single coil RV lead option should be selected.
6 - Preparation for the induction of ventricular fibrillation
- Program VF detection ON
- Adjust the sensitivity on the ventricular lead to 1.2 mV
Check:
- the rate programmed for the onset of the VF detection zone,
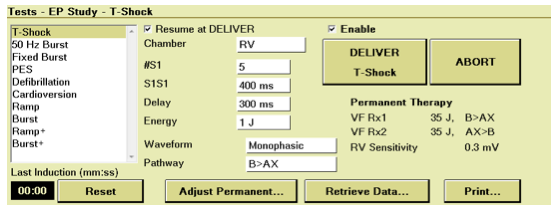
- shock energy selected,
- the coupling interval of the T wave shock which is to be delivered for the induction,
- the availability of external defibrillator in asynchronous mode,
- that the sensitivity has been adjusted.
7 - Induction of ventricular fibrillation
The "ATP before or during the charging" function will not be applied because it is automatically disabled for 30 seconds after induction by a T wave shock or burst ventricular 50 Hz.
Shock on T wave
- - Select the box 'Enable' and press 'DELIVER shock on T wave'.
- - If unsuccessful, adjust the 'time' of the T wave shock (the shock must be delivered by the end of rising phase of the T wave).
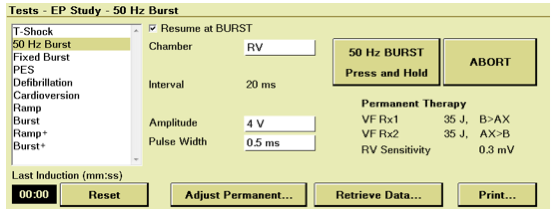
Burst 50 Hz
- Press for 5 seconds and release.
- Remember to scroll through the paper during induction.
8 - After induction
- Review the sensing during the VF episode to ensure there was no drop out and that all VF waves were appropriately detected.
- Measure Shock Impedance
- Check the position and stability of the leads with fluoroscopy to ensure they were not displaced during the shock
- Perform a final test of lead parameters
- Temporarily stop detection if electrocautery is to be used
- Final programming at the end of procedure